

Monday, December 10, 2012
Spray tan anyone?
Loving this Elf on the Shelf business these days!! Having so much fun topping the previous day's ideas.
Saturday, December 1, 2012
Christmas Decor 2012
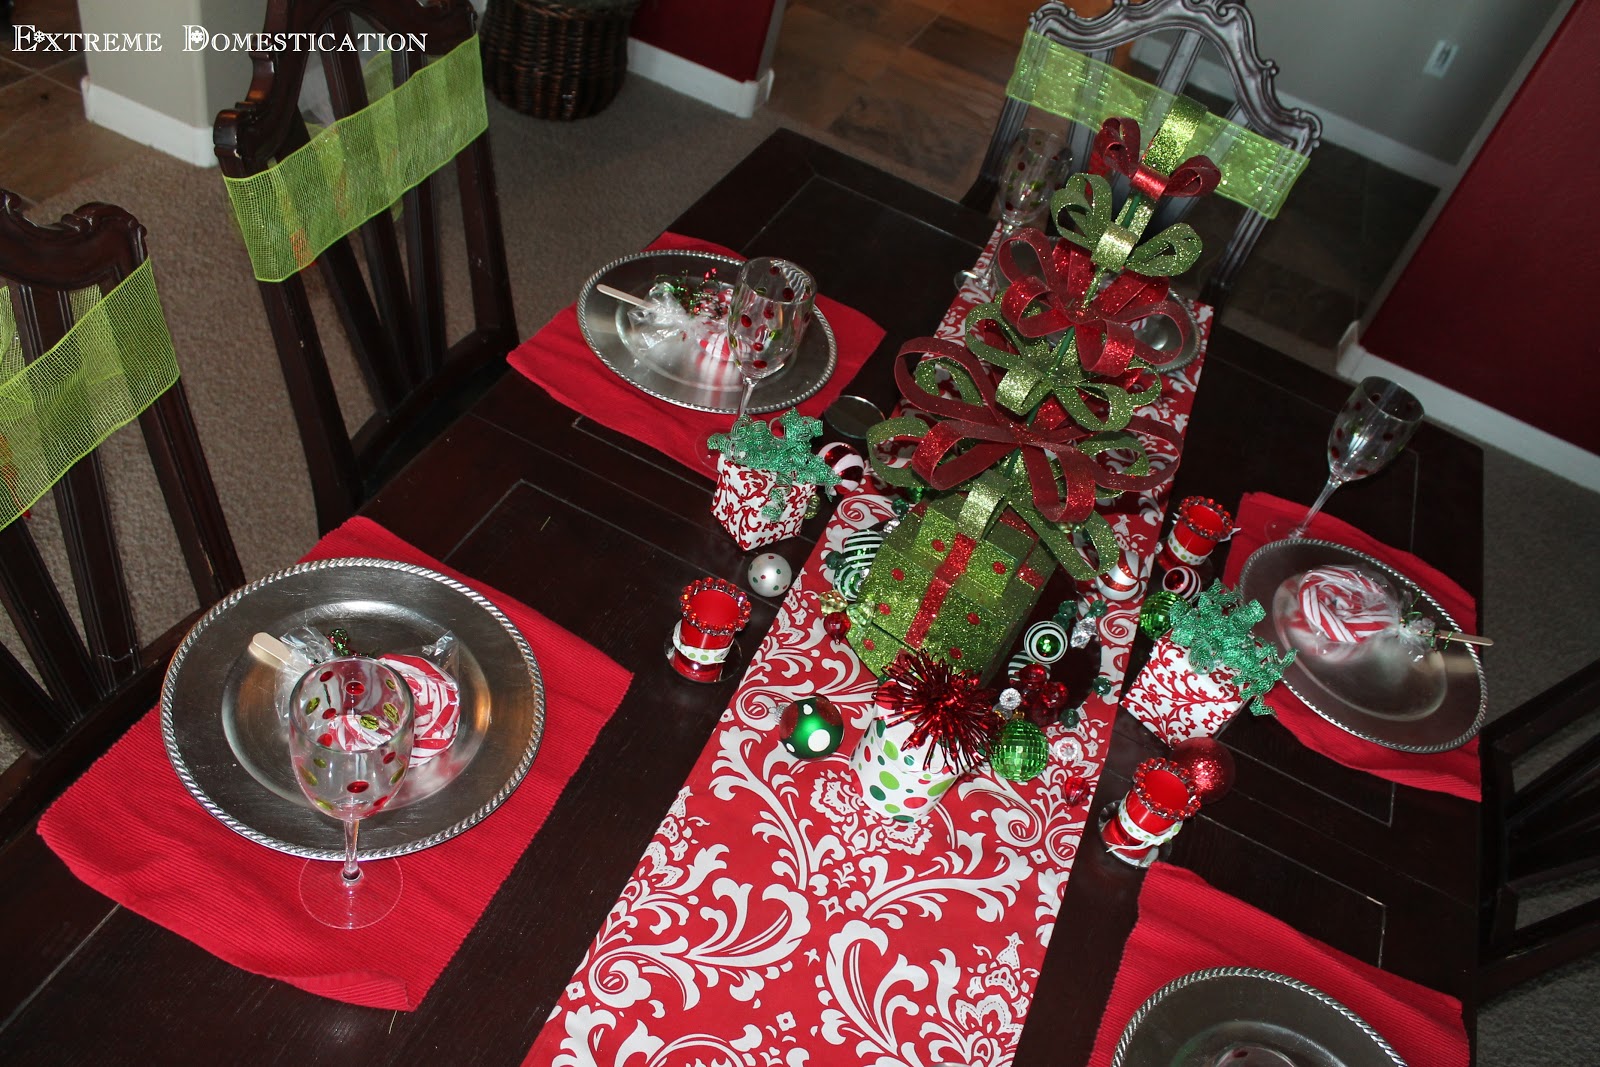
I decorated my house for Christmas Thanksgiving weekend. I added even more ornmanets and sparkly sprigs this year (again). Every year I decide to do a little more. Next year I want to experiment with mesh on the tree. I made an outdoor mesh garland that I will be posting soon.


Friday, November 30, 2012
Christmas Card & Newsletter
I saw an adorable newsletter on Pinterest this year. It was so unique and to the point with cute little graphics to boot. I attempted to make one myself, but that was a disaster! SO, I contacted my usual gal who does my cards for everything and had her make me one. You can have her make you one by visiting http://www.etsy.com/shop/deanworks?ref=shop_sugg. She had actually never seen a Christmas letter like this, so hopefully she will start selling them in her shop along with her amazing cards.
Happy Christmas, Merry Everything!


Monday, October 15, 2012
Spooky Juice Boxes
I saw these adorable ghost/mummy juice boxes on Pinterest, but all I had was black duct tape so I figured I would make a bat!
You will need:
duct tape ($1 store has them)
juice boxes
scissors
hot glue
googly eyes.($1 store)


Thursday, October 11, 2012
All decorated for Halloween!
Here is my 2012 Halloween entry table display. The small skull, spooky gauze, spider web filling and ribbow around the lamp shades were all from teh $1 store. The large skull from Target

I used some plastic cups to elevate my skulls


Happy Halloween!
Halloween Yard Display
All decorated for Halloween! How about you? As I was shopping I realized that Halloween decorations have become so expensive. My daughter wanted some ghosts in the yard, so I wrapped my scarecrows in christmas lights and covered my them with an old white t-shirt and some "spooky gauze," which you can buy at the dollar store. I cut out black eyes with felt.


Sunday, September 30, 2012
Free Halloween Printable

I found this cute printable online. This would look great hanging over a mantle on on a side table. Select the largest size, save to computer, upload to walmart.com or other photo printing service and have it shipped to your home. Or you can print on card stock on an 8.5x11 paper. I bought the frame, mat, and feather boas (2 mini ones tied together) from Hobby Lobby. You can also pull in decor from around your home. I just happen to have a black and white decorated room, so I added 2 canisters from that room. I also removed my candles from my candle holders that are always there and placed some pumpkins on top.


Sunday, July 8, 2012
Revive Old Patio Furniture

This post is nothing new. Many people have painted their patio furniture to give it an update. My husband flips houses and found these chairs in a backyard. The Arizona sun beat them up pretty good. There were some hideous cushions also, but I will spare you the photos of them.
You Will Need:
Spray primer- 2 cans per chair
Spray pain- 2 cans per chair
Make sure you paint in a well ventilated area and wearing a mask would be extra safe. I primed each chair with thick coats, let dry for 15 minutes, and then added my color. I added cushions and decor I already had. Whats funny is the table base was free also from a house my husband had. He built and stained the table top. So this whole seating grouping cost me $20 in spray paint (minus the decor and we already had the wood and cushions)!! I suggest looking on Craigslist for some free/cheap furniture. This time of year is very popular for those listings. Good luck.

.JPG)
.JPG)
.JPG)
Saturday, July 7, 2012
Unique, Beautiful Girls Hairstyle Ideas!
My niece Maddi always has the CUTEST hairstyles. My sister-in-law Tricia is very talented when it comes to little girls hair. She did this cool design on my daughter. She mixed a basket weave with a french braid to keep the bangs back and then french braided and twisted the rest into an updo. She gets her ideas from http://www.princesshairstyles.com/. The styles will take lots of hairspray and practice. I would love to see what you end up with!


Friday, July 6, 2012
Want the softest cookies ever?
My grandmother used to do this trick all the time when I was little. It really helps when you over-bake cookies, leave them out too long at a party, or simply want super soft cookies. You simply stick a piece of bread in an air-tight container with the cookies and overnight you will have deliciously soft cookies. People would look at me like I am crazy, but it works.
This works because the MOIST bread gives up its water vapor into the air, then the DRY bread gains the water from the moist air.
I think I am going to try this trick for stale cereal and chips!


Sunday, May 13, 2012
Host a Rainbow Party!
My daughter's 5th birthday was March 13th. All of her school drawings consist of our family and rainbows. I spent many evenings collecting ideas on the internet, Pinterest, and going shopping to spark ideas in my head. I found a great quote from Maya Angelou about rainbows that I wanted to incorporate into her party. A poster is a great way to bring in some color and add a unique element. I have a few how-to pictures of the poster and the rest are other shots from the party.
For the poster, you will need:
A poster (Dollar Tree)
Glitter (Orange, Purple, Green)
THICK Rip Rap from Hobby Lobby (Pink, Yellow, Blue)
Modge Podge
Paint brush
Measuring tape
pencil
Cricut and paper to cut your words out -or- you can go to a scrapbook store and pay to use their die-cut machines -or- buy ready to use letters
Hot Glue
Stampin Up Dimensionals or small raised foam double-sided mounting squares (Michael's-scrapbook isle)

1. Measure your columns so that you have 6 (you will draw 5 lines). I messed up and had an extra column.


2. Paint one column at a time with Modge Podge. COVER in glitter. Let dry. Repeat in bald spots.

3. The order I used for my colors was orange glitter, pink rip rap, purple glitter, blue rip rap, green glitter, yellow rip rap


I found this Christmas tree at Hobby Lobby for $6 (down from $70)! A green tree can be used for many holidays and parties. At Christmas, I will use it to go with my candy theme. At St. Patrick's Day, I will decorate it will clovers and rainbows. At Halloween, I can put eyeballs and Frankenstine decor on it. You could also use it for a boy's birthday party for an Alien or Monster theme.


The rainbow ornaments were made by hot-gluing pipe cleaners onto a piece of felt, adding cotton balls, and then cutting around the finished rainbow. They can be used again for St. Patty's Day or a summer party.

The lollipop favors were in the wedding isle at Michael's. I also bought some $1 store bins and put out some dots candy strips. I saw the awesome rainbow fruit tray on pinterest. I covered a cookie sheep in rainbow tissue paper to cut down on buying another platter.


The beautiful cake was made by my sister-in-law. $1 store straws stick out the top. The 5 is a wooden one that I covered with glitter and Elmer's glue.


Hopefully, you can come up with some fun ideas. Rainbow party ideas are endless!
Subscribe to:
Posts (Atom)