Sunday, May 13, 2012

Host a Rainbow Party!

My daughter's 5th birthday was March 13th. All of her school drawings consist of our family and rainbows. I spent many evenings collecting ideas on the internet, Pinterest, and going shopping to spark ideas in my head. I found a great quote from Maya Angelou about rainbows that I wanted to incorporate into her party. A poster is a great way to bring in some color and add a unique element. I have a few how-to pictures of the poster and the rest are other shots from the party.
For the poster, you will need:
A poster (Dollar Tree)
Glitter (Orange, Purple, Green)
THICK Rip Rap from Hobby Lobby (Pink, Yellow, Blue)
Modge Podge
Paint brush
Measuring tape
pencil
Cricut and paper to cut your words out -or- you can go to a scrapbook store and pay to use their die-cut machines -or- buy ready to use letters
Hot Glue
Stampin Up Dimensionals or small raised foam double-sided mounting squares (Michael's-scrapbook isle)

1. Measure your columns so that you have 6 (you will draw 5 lines). I messed up and had an extra column.
2. Paint one column at a time with Modge Podge. COVER in glitter. Let dry. Repeat in bald spots.
3. The order I used for my colors was orange glitter, pink rip rap, purple glitter, blue rip rap, green glitter, yellow rip rap
 4. After I stuck the letters on for the quote. I hung the poster over my island using ribbon glued on the back side. I tapes tons of streamers to the ceiling for the backdrop along with another rainbow paper garland.

I found this Christmas tree at Hobby Lobby for $6 (down from $70)! A green tree can be used for many holidays and parties. At Christmas, I will use it to go with my candy theme. At St. Patrick's Day, I will decorate it will clovers and rainbows. At Halloween, I can put eyeballs and Frankenstine decor on it. You could also use it for a boy's birthday party for an Alien or Monster theme.

 The rainbow ornaments were made by hot-gluing pipe cleaners onto a piece of felt, adding cotton balls, and then cutting around the finished rainbow. They can be used again for St. Patty's Day or a summer party.

The lollipop favors were in the wedding isle at Michael's. I also bought some $1 store bins and put out some dots candy strips. I saw the awesome rainbow fruit tray on pinterest. I covered a cookie sheep in rainbow tissue paper to cut down on buying another platter.


The beautiful cake was made by my sister-in-law. $1 store straws stick out the top. The 5 is a wooden one that I covered with glitter and Elmer's glue.

 Hopefully, you can come up with some fun ideas. Rainbow party ideas are endless!

Saturday, March 24, 2012

Rainbow Necklace


I made this necklace for my daughter's birthday outfit. We had a rainbow party and I came across this charm on Etsy. How cute is a piece of rainbow cake!!?? I wanted to make my own necklace, because everywhere you go they want $40 for a child's necklace, which is too expensive in my book. I paid $6.79 for the cake charm and $6.25 for the rainbow gumball beads (also on Etsy. I already had the pearls, wire, and crimping beads, but you can buy inexpensive kits at Walmart or Michael's to get those.


You will need:


Rainbow 12mm "gumball beads" www.Etsy.com/shop/fizzypops?ref=seller_info


Pearls or other beads to alternate in between other beads


tiny silver beads to alternate in between other beads


Needle nose pliers


scissors


beading kit with wire, crimping beads, and clasps ( I like the hook kind or the toggle so my daughter can take it on and off herself. The lobster clasp she can't do on her own)


E6000 glue and a toothpick


1. Figure out the pattern you want. I wrote my colors in order that I want to use them, knowing I will add a silver bead, pearl, and another silver bead between each color


2. Here I layed them out in order to get a view of what it will look like.


3. Cut about 1.5 times the length of the wire you want. I compared my length to a necklace my daughter already had that I liked. Put two crimping beads on the end of the wire, then one of the clasps. Loop the wire around the clasp, then slide the two crimping beads over the folded wire and clamp tightly with your pliers.


4. Here I am reinforcing the crimping beads by painting them with E6000 glue and a toothpick. I don't like to use crimping beads covers because in my experience, folding the crimping bead so it will fit inside the bead cover makes the crimping bead weaker. Also, the glue will help prevent the necklace from breaking and all the beads flying off.


Then, I added several silver beads to begin because this is the part that will be in the back of the neck. It will save you money because you won't be using up all of your expensive beads. I was able to make two necklaces with my gumball beads (I had to buy two cake charms). Make sure you have the same amount of beads on either side of the charm! It might take several trys to get it right to it your desired length.


5. Thread your entire necklace. Don't forget to put the cake in the middle. Add one final crimping bead to the finished end. Leave more wire than you see pictured! I made it too short and it was really hard to get my final clasp on there. I like to put a crimping bead to tightly clamp the threaded beads so they are not loose, then I put my second crimping bead on, then the clasp and then clamp. Then glue again. Let the glue dry for 24 hours, then the necklace is ready to wear!


Sunday, March 18, 2012

The Lorax Cupcakes

I took my daughter to see The Lorax this past week and I couldn't help but notice that the trunk of the Truffula trees looked like those yummy Pirouette cookies that I love! And of course the bulk of the tree resembled cotton candy. This project was not hard at all and so cute and colorful. But what else can you expect from Dr. Suess?


You Will Need:

Cake Mix

Cotton Candy

Pepperidge Farm Pirouette Cookies

Frosting

Neon food coloring

Red M&M's

Green scrapbook paper (not pictured)

Scissors or a Cricut


1. Bake your cupcakes like you normally would


2. Let them cool completely


3. Mix in some food coloring into your frosting


4. Frost the cupcakes


5. Dip one end in the frosting (to secure the cotton candy) and stick the clean end into the center of the cupcake


6. Stick a bog blob of cotton candy onto the top of the Truffula tree. Form the tree by twisting little pieces into spikes


7. Add your "fruits" (M&M's) that fell from the tree at the base


8. Use your Cricut to cut a piece of grass or just use scissors to cut a long strip with one jagged edge. Wrap around the cupcake at the base.


These would be great for a Dr. Suess party or just a fun thing to do with your kids. Word to the wise: the cotton candy will shrivel with air exposure, so if they are for a party, you will have to make them the morning of the party, not the night before.


"Unless someone like you cares a whole awful lot, nothing is going to get better. It's not."

-Dr. Suess

Saturday, February 18, 2012

Mini Top Hat Headband


My sweet little girl is turning 5 in March and because I got an awesome new Canon camera for Christmas, I wanted to try my hand at photographing her. She is obsessed with rainbows right now, so I put together a rainbow outfit. The dress came from The Lucky Princess. Adding a mini top hat makes a cute photo prop and accessory. The bow is removable. You can also use it for a costume or just for your little girl to play dress-up with. I used tomato cans for the main

structure of the hat, so your husband will get a pot of chili out of the deal also!


You will need:


8 oz. can tomato sauce, emptied and rinsed

32 oz. tomato can lid, rinsed

1 piece of flexible felt, any color

Tulle

Feathers

Ribbon

wire

scissors

hot glue

Elmer's Glue

needle and thread
a rhinestone for the bow

a clip for the bow

glitter

3/8" or 1/2" elastic


1. Cut a square of felt and hot glue it around your lid. Be careful not to cut your fingers!


2. Cut a strip of felt for the can and hot glue.


3. I only glued the edges to the can so the glue wouldn't show through.


4. Glue the ends up under the can


5. Glue the ends up over the top.
6. Trace the outline of the can on the felt with pencil.


7. Cut out your circle


8. Hot glue your circle to the top of the "hat"


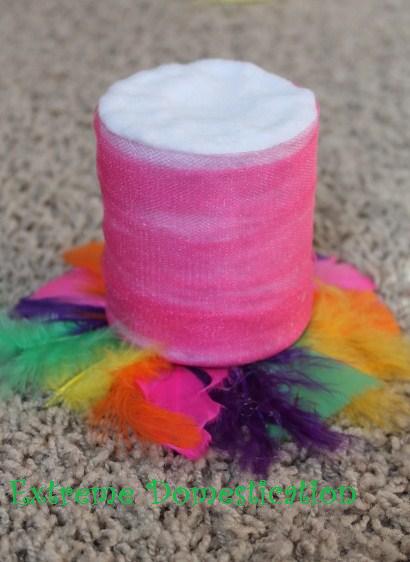
9. Start gluing your feathers around the top of the brim of the hat (lid). Overlap the feathers over the edge a little.


10. Wrap your tulle around the hat, gluing the ends


11. Glue the base to the top of the hat

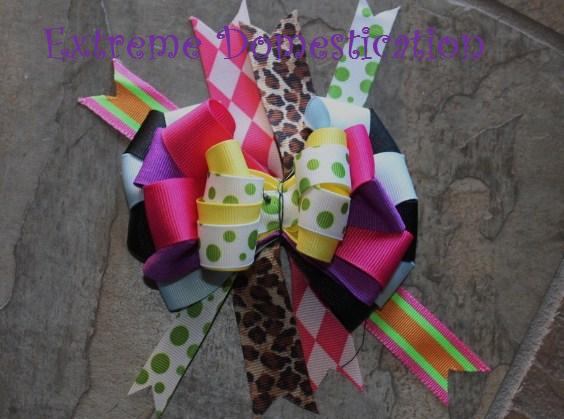
12. Now it is time to make your bow. I used 9 different ribbons. Create three "x" shaped bows, the largest bottom bow you can do 6 total loops (3 per side). Stitch the center of each bow with a needle and thread.


13. Cut 4 ribbon strips that will be attached under the bow for extra detail.


14. Layer the stacked bows on top of the ribbon strips. Stick a piece of wire under the entire bow. I used floral wire.

15. Twist the wire under the bow tightly.


16. Stick a clip under the wire and glue.


17. Fluff all layers of the bow to separate the colors. I put a dot of glue towards the center wire to keep the layers apart, otherwise they will want to go back to overlapping each other. The finished bow:

18. Glue a rhinestone to the center of the bow.


19. Snip a small piece of elastic and glue it to the hat so you have something to attach your bow to the hat with.


20. Glue a long piece of elastic to the bottom of the hat towards the ends.

21. Coat the top with Elmer's glue and cover with glitter. You can also use rhinestones or mini flowers if desired.


22. Now you are ready to photograph your cutie. Some balloons and a cupcake make additional cute props. I would love to see what you come up with!


Related Posts with Thumbnails