Showing posts with label Baby. Show all posts

Tuesday, December 13, 2011

Doggy Towel & Wash Cloth Set

How cute is this wash cloth?! This was something I picked up at the Christmas Idea House. How cute would this be for a baby, along with a jumbo towel? You can create ithe set with a few steps...


You will need:

towel

ribbon

felt (thin kind)

two straight pins
rubber hair band to match towel1. Roll towel long ways into a log


2. Fold log in half


3. Fold folded log in half again

4. Secure with ribbon in the middle of towel

5. Draw some ears on the felt. Leave long tails to tuck in.

6. Cut the ears out


7. Rubber band a portion of the towel to create the nose. This step took me a couple tries to get it right. Tuck in the felt ears on the sides.

8. Pin your felt nose to your puppy. I used black pins to look like "nostrils"


Here is the finished set! It was so easy and I love the way it turned out.


Friday, September 23, 2011

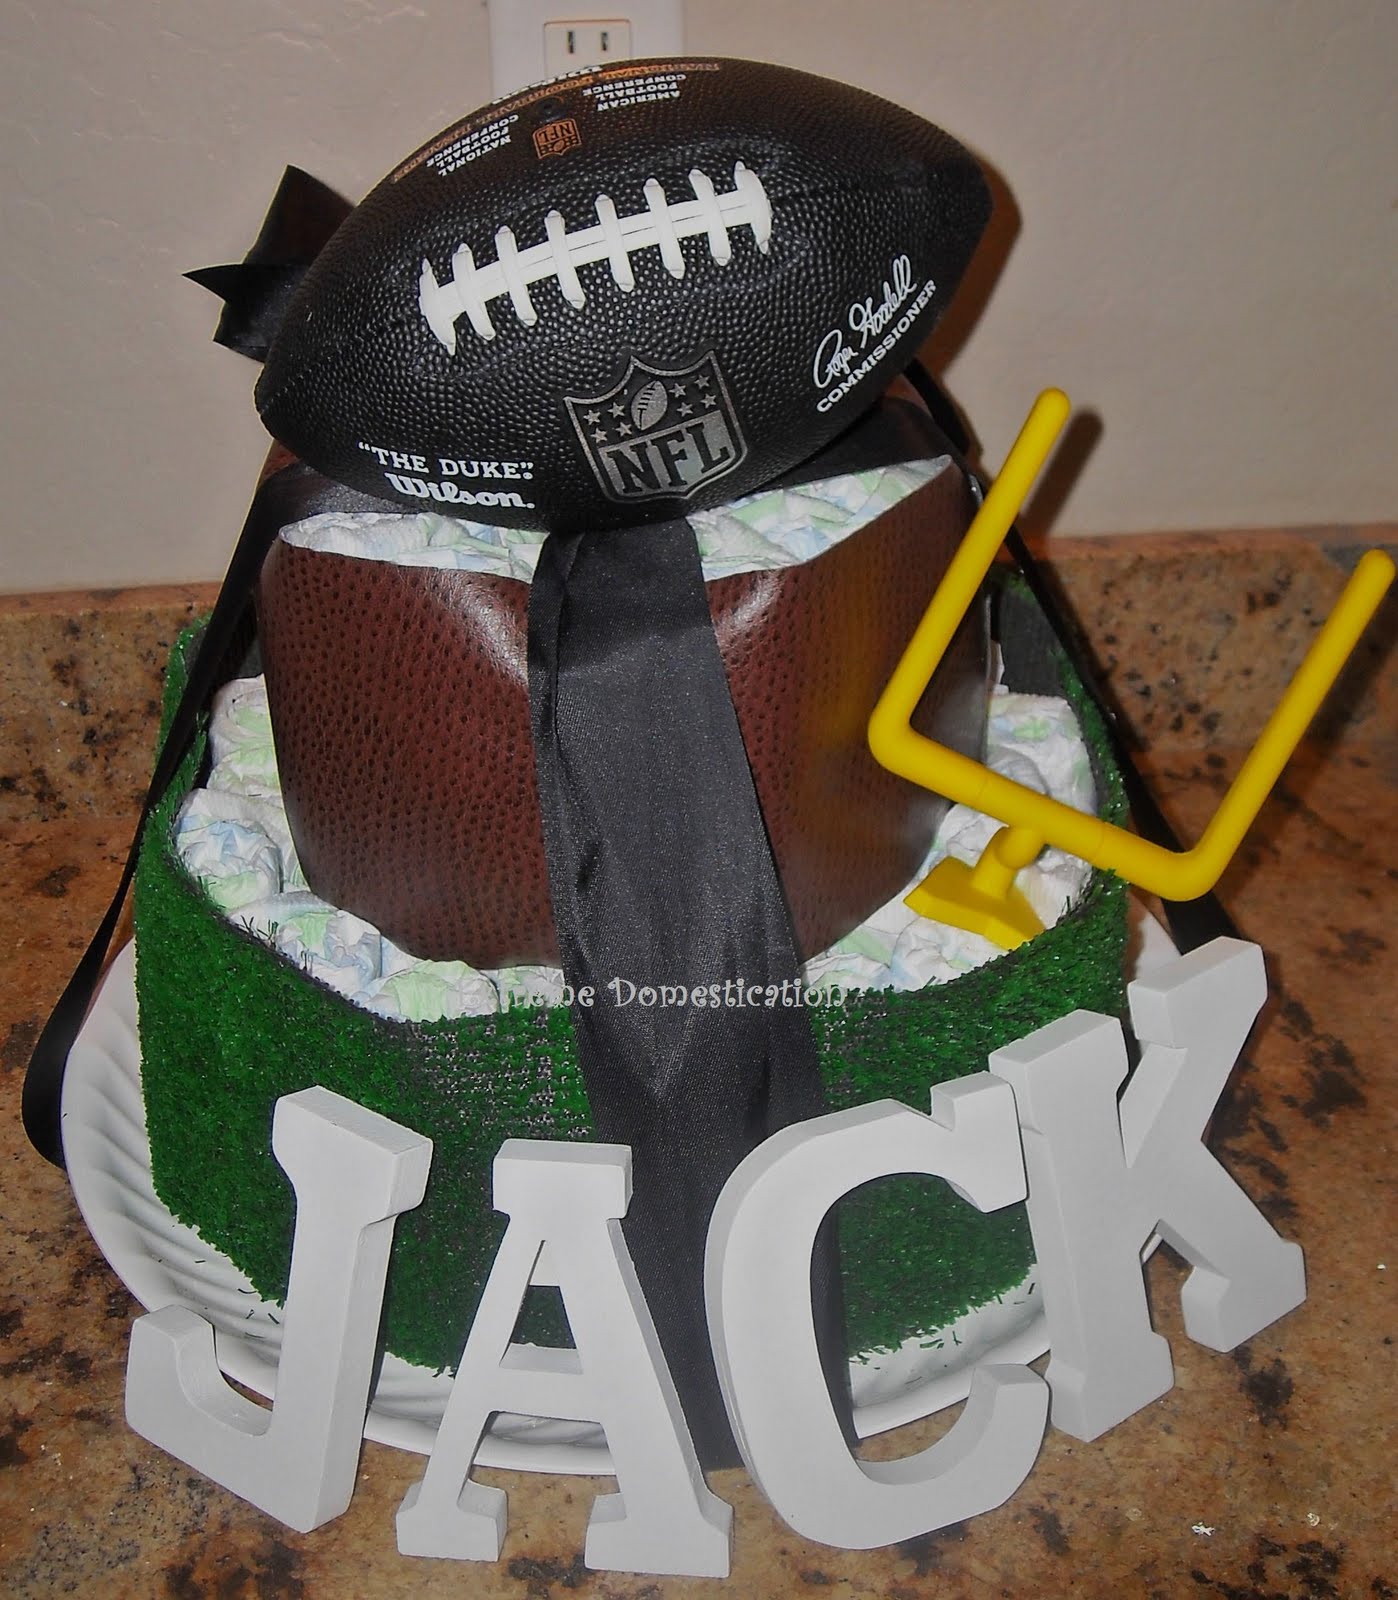
Touchdown Diaper Cake

This diaper cake is great for someone having a boy who is a football fan. The craft was so fast to make also. I love boy stuff because it can be so much simpler.

You will need:


Diapers


leather fabric (about 6" wide)


grass rug


hot glue


ribbon


football


plastic tray


wood letters


rubber bands


yellow goal post was from a Sonic kids meal


1. Roll up a diaper and cut the grass rug the width of the diaper. Glue the ends you cut together to form a circle


2. Rubber band 4-5 diapers together at a time and start filling up the circle.


3. Cut the leather strip next. Make it shorter in length than the grass strip.


4. Hot glue the ends of the leather circle together. Stuff the leather circle like you did the grass one.


5. Put the stuffed leather circle on top of the grass circle and place on the tray. Tie the whole thing together with a ribbon.


6. Place your letters around the cake. I didn't glue them to the cake so the gift recipient can use them later.


7. Place your footbal on top (I didn't glue that either). Then tie on any other embellishments you wish such as binkys, baby combs, socks, etc. Finished!


Saturday, January 15, 2011

Nautical Diaper Cake

"A baby will make love stronger, days shorter, nights longer, bankroll smaller, home happier, clothes shabbier, the past forgotten, and the future worth living for."
-Anonymous
I love baby showers for first-time moms. Everything is opened with wonder, smiles, and a great appreciation. I like to make diaper cakes since they are practical, useful, and decorative.
Below is a Nautical-themed diaper cake to match the nursery of the mom and baby it was made for.
You will need diapers (I like big sizes so they can enjoy it awhile before breaking the cake down), fabric: I chose burlap and a navy blue printed fabric to fit the theme, ribbon, fish netting, a bottle, a tray, and whatever toys, socks, binkies, or other goodies you want to attach.
Roll your diapers. I secure mine with clear plastic rubber bands.
Fold your fabric inside out in half. Sew the seem shut, or glue if you are not a sewer. Then sew the ends together to make a ring. Turn right out and iron.

The top ring of the cake should be smaller than the bottom ring. I did not sew the burlap to make it look rustic

Start stuffing your diapers in the rings.

Stack 'em up. Tie ribbon around the hole cake vertically to secure the layers together. Drape your netting over the top. Cover your bottle in fabric and tie with a bow. I put a small dab of hot glue to stick it to the top. Not too much or the diapers will be unusable.

Set the cake on your tray and tie on your toys

Wednesday, June 30, 2010

Taggie Blanket (Super Quick)


I made my son a taggie blanket, otherwise known as a "lovey" so he has a comfort item in his crib. I used your typical quilting fabric on one side and a soft fabric from the baby section of the fabric store on the other. As far as the ribbon goes, you can use whatever you have. I think it looks cool if it is not too matchy-matchy and all different colors gives visual interest.


1. Cut the desired size square or rectangle or both fabrics


2. Fold edges inward


3. Pin ribbon pieces to one fabric on the inside


4. Pin the other piece of fabric on, hiding all raw edges


5. Sew around entire square (I triple sewed the ribbon parts to be safe)


6. Tack-sew five spots on the blanket so you don't get a balloon shape (and so it lays flat). I did a pattern like the "5" side of a dice


7. Heat seal the ribbon with a lighter


Always watch your kids around the blanket since it is possible the ribbon could come loose!

Saturday, May 22, 2010

Gwyn's Room


I finally got my daughter's room complettely decorated and the theme is pink, brown, and lime green with prints such as damask, polka dots, and paisleys. I have had so much fun doing it!


The valance is fabric staple gunned to a piece of wood and then mounted with "L" brackets. The curtains are hung behind the valance. The bedding I designed and sewed myself with the ideas from a website called http://www.whistlestopbedding.com/ It took me forever, but I love the way it turned out. I had a little help making the main sham from my friend Courtney. The lamp is just hot glue and ribbon and a cute trim I found. The feature wall consists of hand made letters and vinyl paisley stickers which I got from i.e. design co. They have the best prices! The memo board my sister-in-law taught me how to make and is just soft wood covered with batting, fabric, ribbon, and nailed down with furniture tacs. I added a blinged out scroll and feather boa for extra cuteness. The frame is a damask stencil I bought. The wall hangings are 8x10 frames covered with batting and fabric. The butterflies are from the 70's and were hanging in my mom's house until she gave them to me. I had to spray paint them and added swarovski crystals.
Related Posts with Thumbnails