Wednesday, December 21, 2011

Pretty Packaging

Who needs professional gift wrapping? Using ribbons and bows from Walmart or Michael's, you can create really pretty gifts in a short amount of time.

The zebra ribbon was on a previous gift that I re-used in this gift. Glitter sprigs were from Michael's
Can you believe this cute feather ball is from Walmart?! And it was only $0.97. It has a clip underneath so you can clip it to a tree also


More blue....


Patterned packages can look nice as well with coordinating ribbon scraps

I have this green wired mesh all over my tree and formal dining room fro Christmas. I actually found it in the gift wrapping section at Hobby Lobby. I love the not-so-traditional lime green color.


Gold and brown sparkle sprigs are from Walmart, leopard ribbon is furry in texture and from Hobby Lobby. For the brown paper, I turned a wrapping paper I already had (that has an ugly print on it) inside out to wrap the gift.

For the purple gift, I again turned wrapping paper inside out so the white is showing. Then I wrapped the gift in cellophane. Finish with some zebra ribbon and pink accents


Be creative: use old scraps of ribbon and stock up on glittery sprigs after Christmas. Most of mine were purchased last year for pennies on the dollar :)

Friday, December 16, 2011

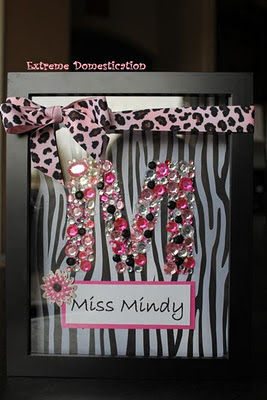
Monogram Shadow Box


Have you all seen those cute crayon shadow boxes on Pinterest or somewhere else? What an awesome gift for a teacher! I've been busy making them, along with a rhinestone version for my daughter's dance teacher. I figured crayons would not be as fitting for a dance teacher. The project is pretty easy, but sort of time consuming.


You will need:

shadow box (Michael's had a 3 pack on sale for $9.99)

Hot glue & E6000 glue or GOOP

scrapbook paper

rhinestones (I mixed inexpensive ones with Swarovski rhinestones)
crayons

Embellishments such as flowers and ribbon

paper cutter

sharp knife and cutting board

pencil

computer with printer

light box table or bright window

1. Print out a large letter on your computer with the desired font. Cut your scrapbook paper to fit your shadow box. I like using printed paper instead of white, like I have seen. Place letter behind scrapbook paper and lightly trace with pencil letter on your light table or against a window. Position the letter slightly higher so you can fit the teacher's name underneath the letter.


2. Start gluing your crayons and/or rhinestones inside the traced letter. I used a mixture of hot glue and GOOP because I do not trust hot glue alone. Hot glue can deteriorate and not be strong enough to hold the weight of the crayons over time. I like my crayons facing one way for a cleaner look. I put some rhinestones on one of the crayons also for some sparkle.

3. I mixed all different color pink, some black, and mostly round rhinestones. Adding some Swarovski stones will make the project look a little better without being too expensive. I used some tweezers to pick off any exposed glue when I was done.


4. Erase any visible pencil lines. Print your teacher's name on white card stock and frame with a colored piece of scrapbook paper. Glue the name under the letter.


5. Add flowers or any other embellishments. Place paper inside frame and tie a ribbon around the shadow box, if desired.


Tuesday, December 13, 2011

Doggy Towel & Wash Cloth Set

How cute is this wash cloth?! This was something I picked up at the Christmas Idea House. How cute would this be for a baby, along with a jumbo towel? You can create ithe set with a few steps...


You will need:

towel

ribbon

felt (thin kind)

two straight pins
rubber hair band to match towel1. Roll towel long ways into a log


2. Fold log in half


3. Fold folded log in half again

4. Secure with ribbon in the middle of towel

5. Draw some ears on the felt. Leave long tails to tuck in.

6. Cut the ears out


7. Rubber band a portion of the towel to create the nose. This step took me a couple tries to get it right. Tuck in the felt ears on the sides.

8. Pin your felt nose to your puppy. I used black pins to look like "nostrils"


Here is the finished set! It was so easy and I love the way it turned out.


Monday, December 5, 2011

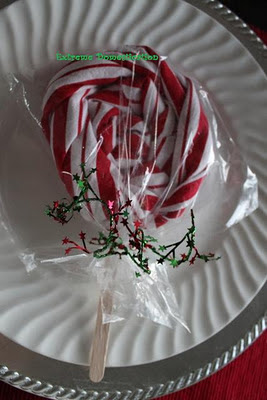
Swirly Lollipop Napkins

I went to the Christmas Idea House last weekend, which is put on by the Desert Club. The Desert Club is a women's group that decorates a mansion every holiday season with Christmas decorations and baked goods. The proceeds go to charity or are awarded in scholarships. I received a scholarship when I was in high school.

Anyway, I saw these adorable striped wash clothes there that were twisted and made into a lollipop. What a cute idea right? So I thought this idea would be great on a tabletop with striped napkins. It literally took me 10 minutes to do 6 napkins. SO easy.

You will need:

Striped napkins

Plastic bags, gallon size, no zipper
Popsicle sticks

Green floral wire

Scissors

Decorative tie or ribbon

Beads or ornaments to attach to the final product (optional)

1. Start rolling the napkin from the corner
2. Start forming a swirl, twisting as you go. Don't twist too tight or too loose.

3. Secure the end to the rest of the "lollipop" with a small piece of wire


4. Cut off about 40% of the bottom of one bag and wrap around the lollipop like a wrapper. Put the Popsicle stick in the bottom and secure with a decorative tie.

The finished product is not meant to stand upright because the stick is not securely attached to the lollipop. After all, your guests are just going to take it apart to use the napkin :)You can add a large bead or a mini ornament for extra sparkle


The napkin will be a cute addition to your table


These are matching candy ornaments attached to my chandelier


Here is some ribbon attached to chair backs along with an ornament (all from Hobby Lobby)


Merry Christmas!

Friday, October 7, 2011

Red Velvet Ghost Truffles

I recently had some really yummy truffles and I started thinking about other combinations I could make. Because I am obsessed with red velvet lately. I decided to make some delicious red velvet truffle ghosts for Halloween. They are so easy to make with only three ingredients and no baking.


You will need: red velvet cake mix, 1 block of cream cheese (8 oz.), and candy making chocolate in vanilla, wax paper for cooling

1. Make red velvet cake as directed


2. Bake cake and cool completely

3. Pull apart the whole cake and put in a mixing bowl with the softened block of cream cheese (only a small piece of cake pictured here)

4. Your final mixture will feel like a really moist play-doh.


5. Form cake mixture into 1 inch balls. Start melting your chocolate in the microwave

6. Dip each ball into the melted chocolate and place on wax paper.

7. Put truffles into freezer overnight to harden

8. You are left with some simple, yummy truffles perfect for parties


I added some ghost faces with regular candy making chocolate to create cute little ghosts
Happy Halloween 2011!